
For the last week, my Twitter feed (@sfriedscientist) has been overrun with pictures of half built canoes. Well, we finally finished the boat, so here is Bluegrass Blue Crab and the Southern Fried Scientist’s guide to building a plywood canoe on a graduate student budget.
If you live near the water, or want to live near the water, or just want people to think you live near the water, you need a boat. It doesn’t have to be much of a boat, just enough to get you, your beverage cooler, a few fishing poles, and a healthy disregard for personal safety out far enough that you can’t get twitter on your smart phone (about 4 miles offshore for Droid users, 600 yards for the iPhone). So why not build a canoe?
You need surprisingly few materials to build this boat. The entire body is made of two sheets of good, flexible exterior plywood (I used 1/4 inch Lauan plywood). A 2 by 4 and some nice scrap wood is fine for the fittings. This is a stitch and glue style boat, so you need zip ties, fiberglass tape, epoxy resin and hardener, wood flour or a putty system, and plenty of tarps, paintbrushes, and throwaway cups for mixing. You’ll also want spar varnish and a good exterior enamel paint. If you’re going to use screws or nails for anything, get them in brass, not steel. This method is simple, but not as easy as brewing beer.
Finally, you’ll want some plans. Bateau2.com has a good free plan available for a cheap canoe. Actually, you can ignore the rest of this post and just follow their plans.
Some fun terms you should know:
- Bow – the front of the boat
- Stern – the back of the boat
- Port – the left side of the boat, when facing the bow
- Starboard – the right side of the boat, when facing the bow
- Centerline – the middle of the boat, running bow to stern
- Athwart – perpendicular to the centerline
- Rubrail – a thin piece of wood that runs bow to stern along both sides of the boat to add strength
- Thwart – a thick piece of wood that runs athwart the middle of the boat to add strength
- Bresthook – a small piece of decking at the bow or stern
- Butt block – a piece of wood used to join two parts of the boat together
- Seat – it’s what you sit on
- Hull – it’s what does the floating
You need a few tools for this project, but nothing fancy. A jigsaw, drill, and orbital sander, plus paintbrushes for the resin and spreaders for the putty should be enough.
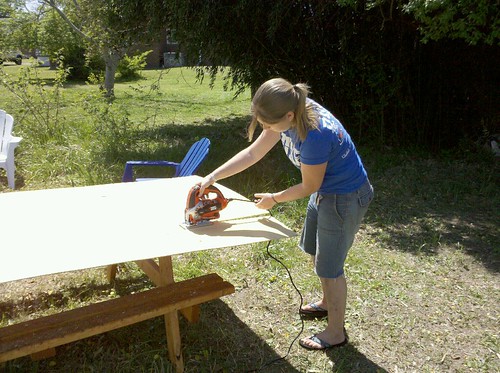
Start by measuring and cutting your panels. Stitch and glue is fairly forgiving, so minor variations won’t affect the final product. The important thing is to make sure all the pieces are symmetric.
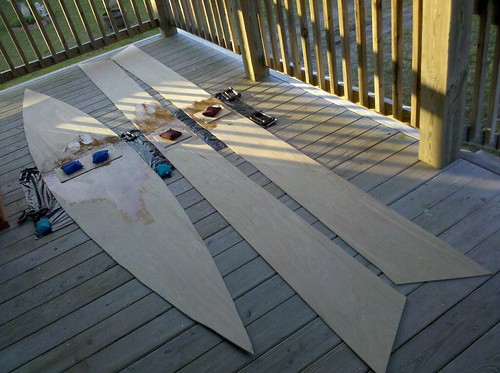
Line the panels up and glue then down with epoxy and butt blocks. Let this cure the full amount of time recommended by your epoxy mix, usually at least over night. Put some weights (dive weights work great) down to keep pressure on the joints. Once they harden, it’ll feel like one piece of wood.

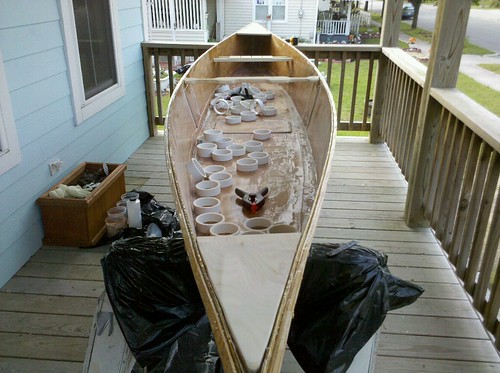
Now we get to the stitch part. Drill small holes in the panels near the edges and zip tie your panels together. Once you have it stitched together, cover the outside seams in duck tape to prevent the resin from dripping out.
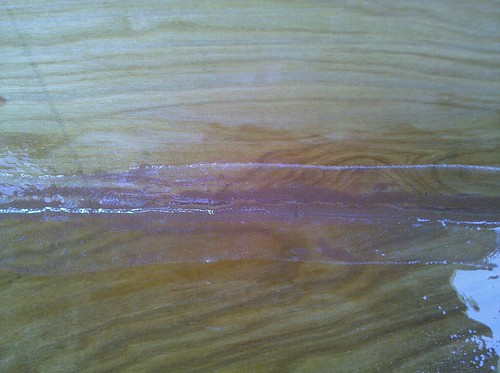
Inside the canoe paint epoxy at every seam. Then spread the putty into the seams, making sure to keep it clean and smooth. Lay fiberglass tape along the seams and paint epoxy over it, throughly filling the fiberglass webbing.
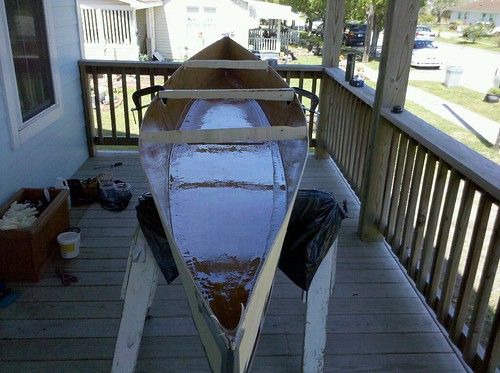
Once the fiberglass is laid down, paint the entire interior with epoxy to seal the hull. Once that hardens, flip the boat over and lay down fiberglass and epoxy on the exterior seams as well.
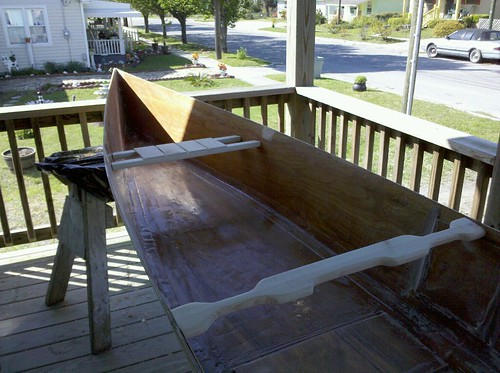
Now is the time to add any fittings you’d like. I built a thwart and a seat, but you can leave the whole boat empty, too. After the epoxy cures, sand it. Then sand it some more. Then sand it again foor good measure.
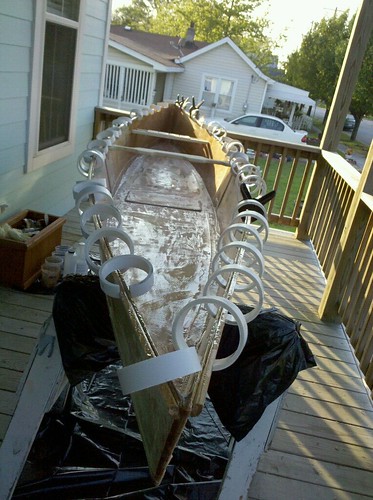
Epoxy glue the rubrails on, carefully clamping as you go. I used homemade PVC clamps for two reasons. One, they’re cheap and numerous, and two, epoxy doesn’t stick to plastic, so they come off easily.
Remove the clamps, install the bresthooks, and you’re ready to paint.
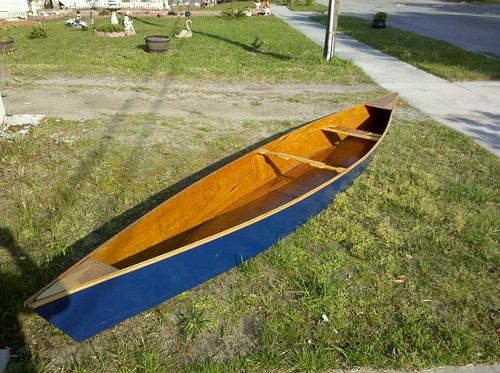
The final product. The interior is coated with semi-gloss spar varnish, the exterior is painted with Duke Blue enamel paint. Rubrails are oak, bresthooks are birch. The thwart and seat are old 2 by 4’s and some left over plywood panels.
- Final cost of materials: $198
- Total Time: 21 hours
Does it float? Maiden voyage this afternoon. WhySharksMatter will be taking bets.
~Southern Fried Scientist
Hey Team Ocean! Southern Fried Science is entirely supported by contributions from our readers. Head over to Patreon to help keep our servers running and fund new and novel ocean outreach projects. Even a dollar or two a month will go a long way towards keeping our website online and producing the high-quality marine science and conservation content you love.
What? $198…. That’s amazing. I guess you should never say never and that anything is possible. That definitely took some skill and research for you to complete it in 21 hours. My question is… did it actually float and work during the entire trip?
Did it float? My “clients” need to know if I’ll be coming after them with a baseball bat.
Of course. Read your blog.
Very informative!
I don’t think I’m gonna need to be building a canoe anytime soon, but if I do I at least now know where to go haha.
I’m waiting for a post entitled: How to brew beer in your self-constructed canoe
haha
Very neat project. I had little doubt it would float but how was the stability? Canoes already have a reputation of being rather “tippy” with respect to other boats. If you were to do it again, would you make any adjustments to your original plan?
Nice work, definitely the solution for the best price. I had a habbit of turning over canoe’s so I moved onto sail boats.. I turned those over too. Great work in keeping it simple and light, that is the key.
About as stable as any low-end canoe.
How heavy is it?
Pretty light, about 35 pounds
In your instructions it is stated that you zip tie your panels together. Can you give an illustrated example of what a zip tie looks like?
Merci,
R.S.
These are zip ties
Where did you get the pattern ? What grade and thickness of plywood did you use ? What size PVC pipe did you use. If you can please send your reply to my email address.
Thanks
All those questions are answered in the post. The pipe is 3 inch PVC cut to 1 inch think clamps. Use a shop vac so you’re not dumping PVC cuttings everywhere.
I can see her job interview going about like this…
“well I gradu-”
“stop! I know all about how that school mumbo jumbo goes, plus, I read it on your damn resume…tell me something about you I might be surprised by”
“Well, I woke up one morning and said hey, I think I’ll build me a damn canoe. So I did. Cost me $198 and I did it in 21 hours”
“Stop! You hired”
Damn fine job.
After making it and using it, what would you differently if you were to make another canoe? Wider base? Longer? etc..
Yes, indeed. I would like to know how you would do it differently too; I am in the market for a canoe and would love to build one too, or maybe not depending on whether you think it’s ‘worth it’ to have your own or spend a bit more for a used one…..
I’d stick to the instructions but use a higher grade plywood.
Great article and the photos are very helpful. I notice you put the seat in the back as opposed to the middle. Did this affect the canoes performance? How did you attach it to the sides?
Very nice. I am currently half way through the project myself. Panels cutr, next step: butt blocks. Did you remove the zip ties before fiver glassing?
Almost forgot, 200 yds, no signal for a motorola clutch
Zip ties come out before fiber glass goes on (though some of them were stuck enough that I just sanded them down).
great work, just great , wow
what are the measuremnt of this cannoe. i like to build one just like it.
Wow, bold pursuit. Pictures of the progress are fun. See any cool wildlife out in the canoe? Has the beauty survived a trip with more than one passenger yet?
What do you think about making this a 2 man canoe. Maybe making it slightly longer? Do you think the plywood could take it?
How much epoxy do you use? do you get a paint can size? or just the tubes? thanks
I’d order about a gallon of resins and 1/2 gal of hardener from a good marine supplier and see how much you need after that. Don’t use the doofy tubes or cheap stuff from the hardware store.
I know you answered the weight and stablity questions. Do you have any idea on the load capacity? Track well? I’ve been looking for a modest canoe to replace my kayak so I can take my pup with me…this might be the answer!
For the rubrails, do you put them on the outside and the inside of the boat? Or just the outside?
Just the outside.
Where’d you get everything for such a cheap price?
Wood from the local big box store. Epoxy and fiberglass from the links above.
Very nice! But you could have done it for ten times less… instructables has a very nice piece on a duct tape kayak, you should check it out
Great informative build! I’m considering using this same plan myself and I want to know if this canoe can support me and a buddy. So I have two questions. How many people does it hold? How did you attach/secure the seats?
Brilliant and inspirational set of photos – I have started myself and have cut out as per the free plans but the side panels seem too long at first sight -mine look like your photos – does the extra length of the side panels help pull together the curves of the boat or is there a mistake in the sizing on the bateau plan?
Obliged if any help available.
Cheers
im trying this. thanks alot for the info gonna check out some of your other how to next time i build something, i also realy like the way your second paragargh is phrased.
and 35 pounds seems like bulshit mabye if you used eight inch… i dont know i think mine will end up heavier
ps a averge weight of a 14 foorer is 85 so if it is 35 koodos
what were the demencions? for the base and the side pieces?
I need to know asap please.
All the answers you seek are in the post.
I would like to try this but make the boat with a square stern for a 3hp motor, how did yours float?
Hey I Built a Tugboat It Took Me 4 weeks LOL
And Cost Me a Fking Fortune