Last month, I wrote a heartwarming little story about how doing a fun weekend hardware project with my daughter led to fixing one of the most annoying non-critical problems with the OpenCTD. After a month of testing, we have fully implemented the new power management system into the next iteration of the OpenCTD.
Currently, there are hundreds of OpenCTDs scattered around the world that don’t have the new implementation, so in addition to updating the guide and files, I’ve spent the last few days putting together a hackers guide to upgrading your OpenCTD if you have the older rev 6 carrier board. This will, of course, all go up on the OpenCTD GitHub repository imminently, but, since the blog reaches far more OpenCTD users, I am also posting it in its entirety, here.
Enjoy!
OpenCTD Power Management Upgrade
One of the more frustrating problems with the current OpenCTD is that in order to charge, the device must be turned on. This is due to the use of an electromechanical switch that breaks contact with the battery to power down the device. The design results in users failing to charge their device if they forget to turn it on or producing massive, empty data files if their OpenCTD is left on and charging for long period of time. This is bad design. We can fix it.
Fortunately, we have developed a solution that has be implemented in the next revision of the OpenCTD carrier board. Unfortunately, almost all of the carrier boards currently in circulation are the OpenCTD rev 6 carrier boards with the annoying charging protocol. The good news is that we have a workaround.
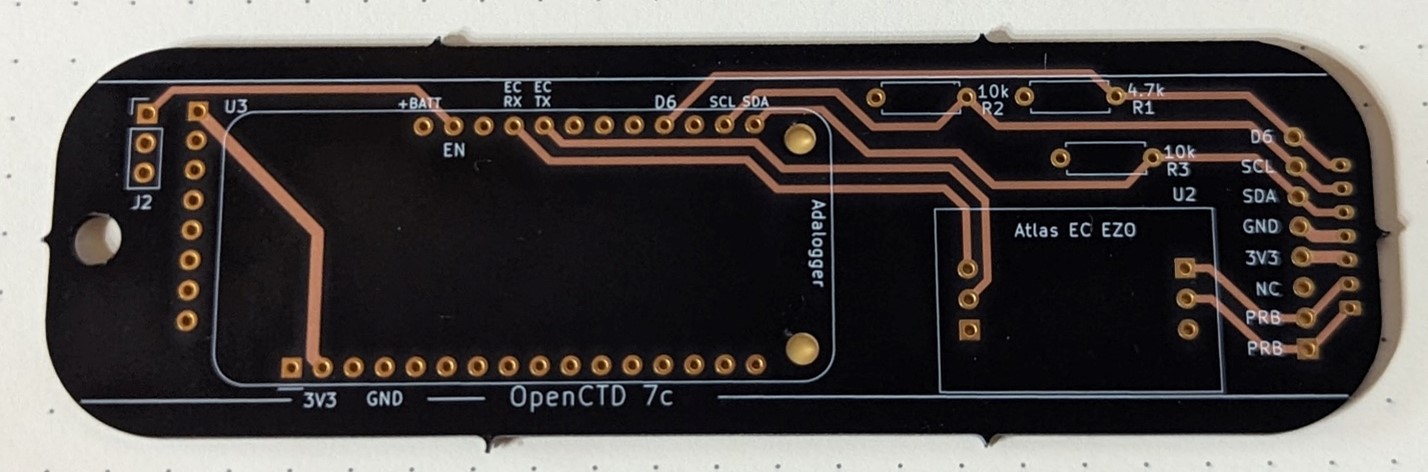
If you have an OpenCTD custom carrier board labeled OpenCTD 7c, congratulations, you have the new and improved board. There are a few changes to the current build guide (Construction and Operation of the OpenCTD, Fourth Edition) that will make the build a tiny bit simpler. In Chapter 8 – Power the CTD, you can ignore steps 2 and 3, the two pins labeled J1 no longer exist and the power is routed through board to the EN pin on the Adalogger M0, the switch is also in a slightly different location.

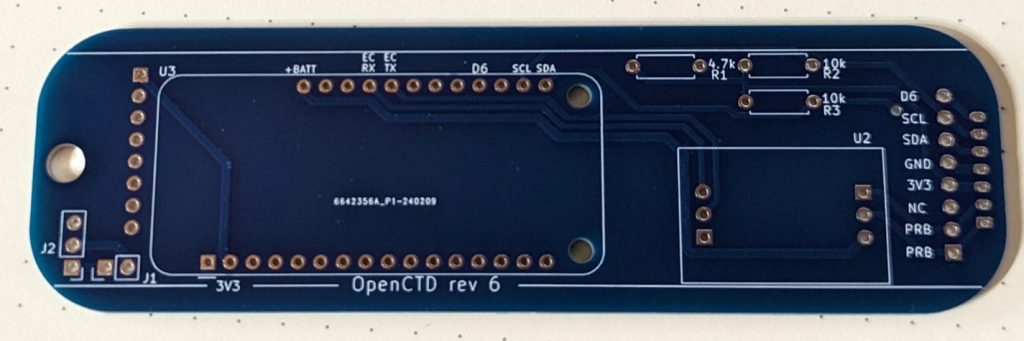
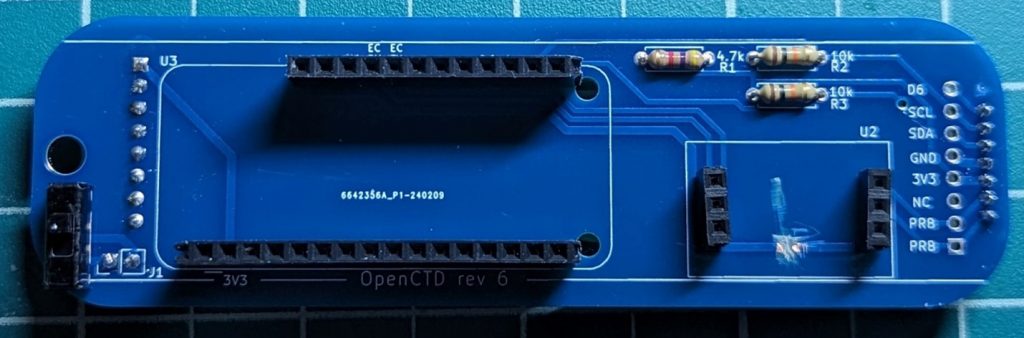
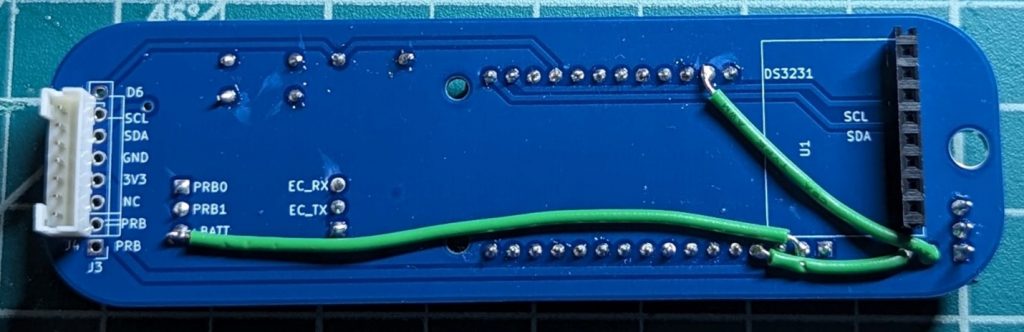
If you have an OpenCTD custom carrier board labeled OpenCTD rev 6, then you have the older power management solution that only charges the battery when the entire device is turned on. There are a few steps involved in re-routing the power management to make the board charge while the batteries are off. You will have to solder jumper wires between a few pins and break the trace which connects the Atlas EZO EC chip to the battery. To do this, you will need a knife, a soldering iron, wire cutters, and some short solid core or stranded wire to jump the pins.
It is easiest to do this after you’ve populated the custom carrier board with header in Chapter 6.2 Prepare the Carrier Board.
Rerouting power to the Atlas EZO EC Chip.
The first step is to break the connection between the Atlas EZO EC chip and the battery so that you can connect it directly to the 3V3 output on the Adalogger M0.
- Expose the +BATT trace under the Atlas EZO EC chip. Using a knife scrape away the coating over the large trace that runs from the pin labeled +BATT on space the Atlas EZO EC chip. This trace is the only trace on the topside of the board between the two 3-pin headers for the EZO EC chip. You will know that you have scraped down far enough when you reveal the bare copper underneath.
- Break the +BATT trace under the Atlas EZO EC chip. Using the same knife, scrape away the copper trace, as shown in figure 3, to break the connection between the EZO EC chip and the battery.
- Jump the +BATT pin to the 3V3 pin for the Adalogger M0. On the reverse side of the board, solder a lead wire to the +BATT pin for the Atlas EZO EC chip and the pin labeled 3V3 on the headers for the Adalogger M0. Refer to figure 4 below.
Redirecting the 3-pin toggle switch to GND and EN
Neither GND nor EN are labeled on the Rev 6 custom carrier board, but both are labeled on their corresponding pins on the Adalogger M0, which can be used for reference.
GND is the fourth pin from the left on the longer of the two pin rows for the Adalogger M0. If you flip the board over, you will see that the traces for the GND pin form an X, connecting the pin to the universal ground for the board.
EN is the second pin from the left on the shorter of the two pin rows for the Adalogger M0. It is next to the pin labeled +BATT. EN is short for “engage” and it is a signal pin which tells the board to turn on when the pin is connected to GND.
- Connect one of the pins labeled J1 to GND. It does not matter which of the J1 pins you route to the pin labeled GND on the headers to the Adalogger M0. Refer to figure 4 below.
- Connect one of the pins labeled J1 to EN. Route the unused J1 pin to the header pin for EN, which is to the right of the pin labeled +BATT. This pin is unlabeled on the carrier board but its corresponding pin on the Adalogger M0 is labeled. Refer to figure 4 below.
Your board is now ready to charge, even when powered down. Populate the board with components according to the manual and plug the battery directly into the JST connector. You no longer need to cut the battery wire.
Congratulations, you’ve just hacked your OpenCTD for improved functionality!
A new 3D printable chassis will shortly be available on the OpenCTD GitHub Repository. It replaces the existing chassis and work with either board.